
When you commit to a Japanese tattoo sleeve, you’re not just getting inked — you’re stepping into a centuries-old art form. Unlike Western tattooing, which often treats designs as individual statements, Japanese Wabori (和彫り) tattoos are built for flow. Each piece tells a story, harmonizing background, foreground, and body movement into one seamless visual symphony.
But what does it really take to build a full arm Wabori design? Here’s how the pros do it — and what you need to know before you begin.
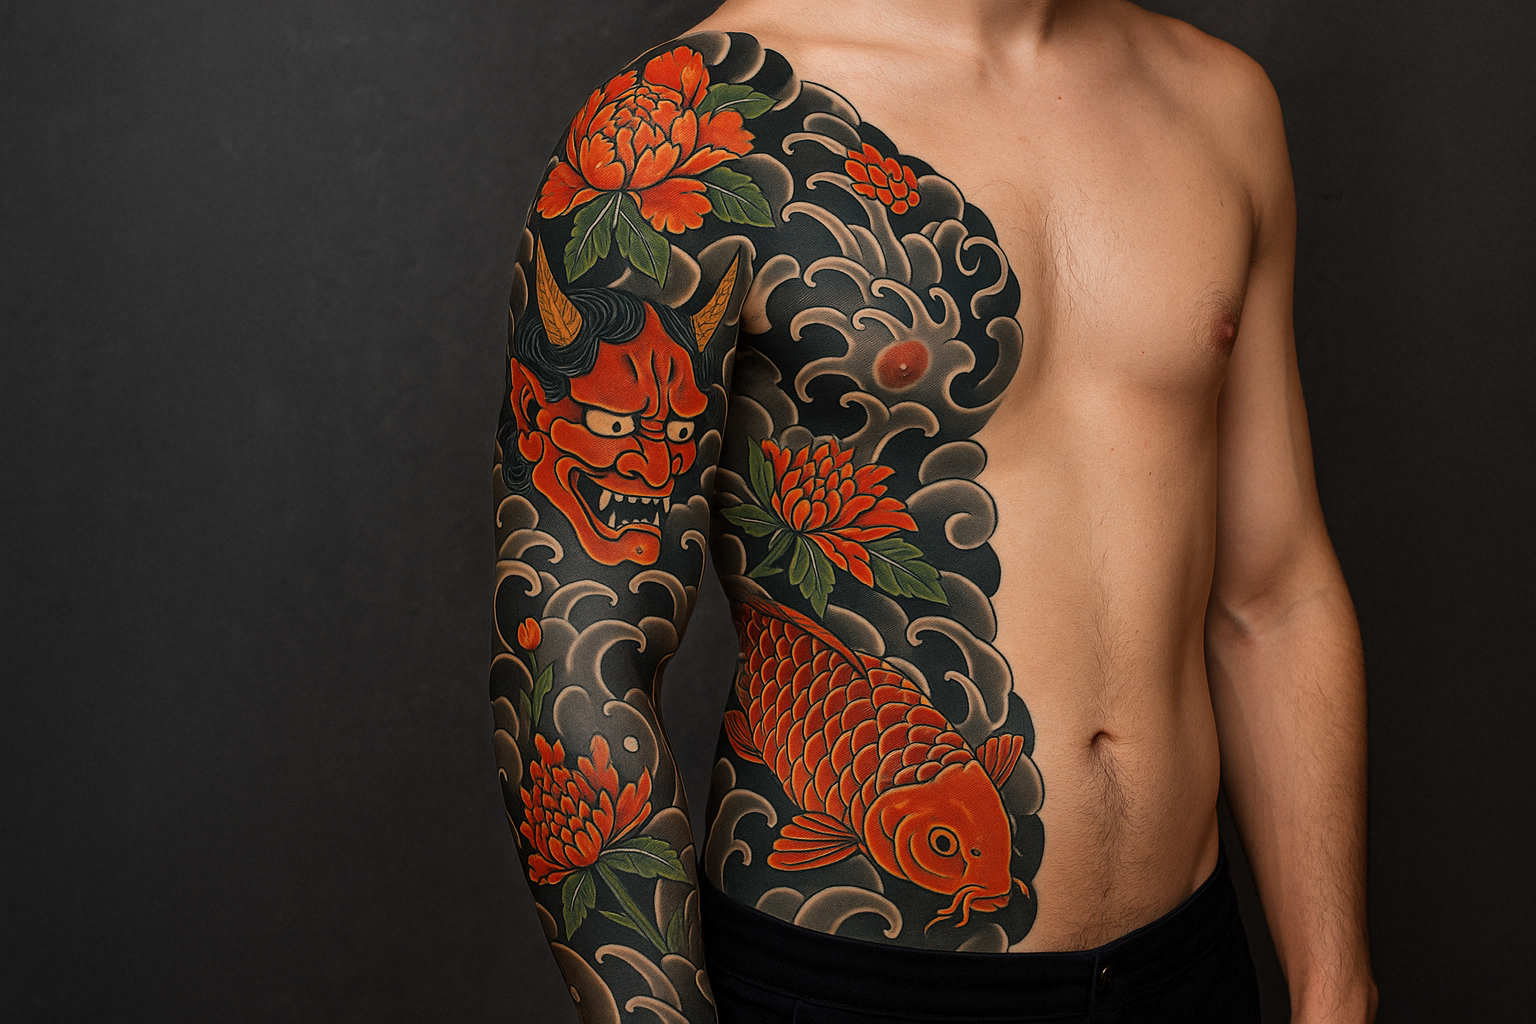
🧠 First: What is Wabori?
Wabori translates to “Japanese carving” and refers specifically to traditional Japanese tattooing, often done using either machine or hand-poked Tebori techniques. It follows strict aesthetic principles — not just in the artwork itself, but in how the images flow with the muscles, joints, and bones of the body.
While Irezumi is a broader term for Japanese tattooing (including historical, cultural, and criminal associations), Wabori focuses more on the style and method of visual storytelling.
🪷 Step 1: Choose Your Central Motif (Shuyō Gadai)
Every traditional sleeve begins with a main motif — often a mythical figure or animal. This is the focal point of your entire sleeve and often sits on the outer upper arm or shoulder, wrapping forward or downward.
Popular central motifs include:
- Dragons (symbol of strength, wisdom, and elemental force)
- Tigers (courage and protection)
- Koi fish (perseverance, personal transformation)
- Hannya masks (emotional complexity, rage, or unrequited love)
- Deities like Fudo Myoo (immovable protector) or Kannon (compassion)
🔍 Tip: Your motif should reflect your personal journey or traits, but it should also fit your physique. Bigger designs like dragons or warriors suit broader arms, while more compact icons like koi or masks can adapt to smaller builds.
🌊 Step 2: Add Background Elements (Keshōbori)
This is where Wabori flow begins. The background is not an afterthought — it’s the structure that gives the entire sleeve rhythm and depth.
Classic background patterns:
- Wind bars (Karakusa) – curved spirals that frame figures and add motion
- Clouds (Kumo) – soft or aggressive, used to suggest altitude or divinity
- Water (Suibori) – flowing waves to wrap joints and bring life
- Flames (Hi) – especially behind deities or masks, adding power
- Smoke or mist (Kasumi) – softens the transition between elements
These elements wrap around the arm and help your sleeve “breathe.” Without background flow, the tattoo looks stiff or crowded.
🌸 Step 3: Layer Secondary Motifs (Fukuda)
Once your background is set, you’ll add supporting elements that balance the sleeve and reinforce your theme. These are often placed in forearm, elbow, or inner-arm areas — spaces that shift and bend frequently.
Popular secondary motifs:
- Peonies (Botan) – strength through beauty
- Chrysanthemums (Kiku) – resilience in harsh conditions
- Cherry blossoms (Sakura) – fleeting beauty and mortality
- Lotus flowers (Hasu) – spiritual awakening and rebirth
- Snakes or frogs – duality, cunning, fertility
🌺 Balance matters: A sleeve with a dragon and no botan feels off-balance. Artists often pair masculine energy (tiger, snake, oni) with floral grace to complete the visual yin-yang.
🧵 Step 4: Elbow, Armpit, and Wrist — The Invisible Zones
These zones are the hardest to tattoo — and to endure.
- Elbow ditch – tricky for shading and line stability
- Inner bicep/armpit – painful, often left minimally inked
- Wrist edge – visible edgework must be clean and seamless
⚠️ Many artists will tattoo these last. If you stop halfway through a sleeve, these “gap” zones can make your tattoo feel unfinished. Plan for the pain, and commit.
🧪 Step 5: Tebori vs. Machine: Which Method for Wabori?
Traditionally, Wabori was done using Tebori — hand-carved tattooing with needles soldered to bamboo or metal rods. This method is more labor-intensive but creates softer gradients and unique skin textures.
✨ Pros of Tebori:
- Quieter, more meditative process
- Gentle ink insertion, often less bleeding
- Incredible shading, especially for water and wind
💥 Machine Pros:
- Faster session times
- Easier access to global artists
- Still effective for bold outlines and modern twists
Choose the method that matches your spiritual or aesthetic goals. Many clients today opt for a hybrid: machine for outlines, Tebori for shading.
📅 How Long Does a Full Japanese Sleeve Take?
You’re looking at 30 to 60 hours across multiple sessions — often stretched over 6 months to 2 years.
Typical timeline:
- Consultation + Sketching
- Stencil and Outline
- First wave of shading
- Background layering
- Detail and saturation
- Final retouch
🔁 Healing time between sessions is key — especially with Tebori, where your skin needs longer to repair.
🧭 Final Tip: Work With a True Wabori Artist
Not every “Japanese-style” artist knows Wabori flow.
Find someone who:
- Has apprenticed under a Japanese master or Horishi
- Understands how to wrap design around bone/muscle
- Has knowledge of Japanese symbolism and spacing
- Honors left-to-right storytelling in the sleeve
Ask to see full-sleeve portfolios — not just isolated designs.
💬 Closing Thoughts: Your Body Is the Canvas
A true Wabori sleeve feels like it grew with your skin — not stamped on it. It’s a lifelong piece that evolves as you do. Whether you’re honoring ancestry, reclaiming power, or expressing survival, the flow of Japanese tattooing holds ancient energy — and a story only your arm can carry.
📌 Image Insert Suggestions:
- [Image 1]: Sketch of a full Wabori sleeve broken into layers (main motif, background, floral elements)
- [Image 2]: Tebori tool close-up with soldered needles (Hari)
- [Image 3]: Side-by-side of machine vs. Tebori shading on similar design
- [Image 4]: Arm in progress with outlined dragon and water wrap
🔗 Want to wear the spirit of Irezumi even without the ink?
🖤 Check out our Irezumi Tattoo Tees Collection — inspired by real Horimono art, made for rebels who wear survival like a second skin.
Leave a comment
Your email address will not be published. Required fields are marked *
You must be logged in to post a comment.